Monday, August 31, 2015

The Cretan Stitch

Today, Lisa Hawkes, SAGA President, takes us through the dynamics of using an embroidery stitch for smocking as you work on your Trees for Troops Smock-Along.

In the Trees for Troops Smock-Along, clue number two is stitching a row of the Cretan Stitch. The Cretan Stitch is an embroidery stitch originally from the island of Crete where it is used to decorate women’s skirts. It was adapted for smocking and gives lovely results. Below I will take you step by step through the Cretan Stitch.


Come up in the valley between the first and second pleats just beneath the cable stitch on row 7.


Insert your needle from the right to the left through the first pleat to get into starting position.


Move down to row 8 and over 1 pleat. Take a stitch on row 8, keeping your needle horizontal to the pleating thread.


Move back up to row 7 and take a stitch in the next pleat.


Continue across the row. That’s it – it is that simple! There are a few things to notice:

1.       There are no level stitches in the Cretan Stitch.

2.       Each stitch goes through a new pleat and each stitch only goes through one pleat.

3.       On each stitch you alternate between rows.

4.      You can make sure you are doing it correctly by using the cable row to guide you. Each Cretan stitch lines up with the same cable stitch. On row 7, the Cretan stitch lines up with the down cable of the cable stitch. On row 4, it lines up with the up cable of the cable stitch.

If you have questions, just ask on our facebook group page – I will be checking there. SAGA offers a wonderful correspondence course on the advance stitches if you would like to learn more about these and other smocking stitches. You can read about our courses under the education tab on our website.

Happy Smocking!

Thursday, August 27, 2015

Valley Forge Hotel Information


The last SAGA Retreat for 2015 is being held at the DoubleTree by Hilton at Valley Forge, Pennsylvania. The hotel is located at:

301 West DeKalb Pike, King of Prussia, Pennsylvania, 19406

Phone: 610-337-1200

Parking is complimentary.

The hotel rooms have all the usual amenities and also include Internet access and a coffee maker.  Mini fridges and microwaves are available on request for a fee.

The SAGA package includes breakfast.


Directions from the Hotel Staff

From the Northeast
Take the New Jersey Turnpike South to the Pennsylvania Turnpike Exit 6. Follow the Pennsylvania Turnpike West to Exit 326 (Valley Forge). After the toll plaza, take the third right, Exit 328 (Route 202 North - King of Prussia). Hotel is one mile on the right.

From the South
Take 95 North to Route 476 North (Exit 7). Take 76 West (Schuylkill Expressway) following signs for Valley Forge to Exit 328 (Route 202 North - King of Prussia). Hotel is one mile on the right.

From the East
Take the Atlantic City Expressway to Route 42 to the Walt Whitman Bridge. Follow 76 West (Schuylkill Expressway) to Exit 328 (Route 202 North - King of Prussia). Hotel is one mile on the right.

From the West
Take the Pennsylvania Turnpike to Exit 326 (Valley Forge). After the toll plaza, take the third right, Exit 328 (Route 202 North - King of Prussia). Hotel is one mile on the right.

Distance from Philadelphia International Airport is 20 miles and approximately a 30 minute drive. 

Sunday, August 23, 2015

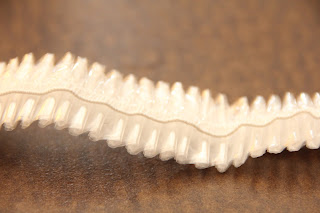
What is this?

This object came in a little box and looked ready to smock on as the pleats were all even and perfect.


It was about 8 inches long and 3/4 inches wide. It was actually made of plastic, so maybe a little hard to smock through, but all the same it did look like it had been through a pleater,but just didn't have the pleating threads.


So, what was this object and where was it found?

 
It's a shower cap and was found in the rooms at the DoubleTree Hotel, Skokie, Illinois.


Was this not the perfect thing for a SAGA member to find in their room at a SAGA retreat?!


Wednesday, August 19, 2015

Singer Hand Operated Pinker


Do you have one? I do. It is such a wonderful little machine with a simple, yet effective purpose.


Made by the Singer Manufacturing Company in the 1930’s it was marketed as an aide to the fashion sewer. It was designed to finish the edges of seams and help reduce bulk when using something like wool. The machine cuts a wave in the fabric and is faster and easier to use than the hand held scissors designed to do the same thing. Pinking the edge also helps reduce the chance of the seam fraying.

The cut is not based on the blade being sharp, but rather the pressure of the blade on the steel disk. If the pressure of the blade on that disk is increased, it can cut through thicker fabrics, including leather. There is also a built in cutting guide on the side of the machine. The machine is best secured to a table or other such surface with a C-clamp to stop it from moving around when using it. A clamp came with the pinker when it was new, but these have often been lost over time. A new clamp works just as well.

 
The machine came with the wide-wave blade but by special order other blades could be obtained. These blades were a straight edge blade and a narrow scallop blade. As these were a special order, they are much harder to find today.


Saturday, August 15, 2015

Needle Tatting


Needle tatting gives the same look as traditional shuttle tatting but is a lot easier to learn (well for myself, anyway!).  Any pattern you can make with a shuttle can be made using the needle method also. So why not give it a try and Wee Care™ is the perfect place to practice and perfect your technique, whether it be traditional shuttle or needle tatting.
SAGANews Volume 36 Issue 3 has a project where needle tatting is used on the edge of Wee Care™ gowns and so I thought I would post the basic method on the blog for those interested in learning or needing a refresher course.
Needle tatting uses a long thin needle with an eye and any thread, but perle cotton and crochet threads are generally used. The thicker the thread, the thicker the needle needs to be and the larger the finished tatting will be. The motion of making a stitch (which consists of two loops) is one that soon becomes a rhythm  as you work the thread  and needle to the front and then to the back to form each stitch.
Tatting Needle and thread

Thread the needle, leaving at least a 3 inch tail.
The threaded needle is held in the right hand and the strand coming from the ball of thread is wrapped around the left thumb in a clockwise direction. The first loop is made by picking up the thread next to the thumb. This thread will be to the front of the strand coming off the ball. Slide loop onto the needle.
                                           Thread clockwise, loop picked up from the front
(The thread coming from my left hand is in front of the thread coming from the needle in my right hand)
First loop on needle-thread on top
 
The next loop is made by wrapping the thread around the thumb counterclockwise and picking the loop up from behind. The thread from the ball will be behind.

Thread counterclockwise and loop picked up from behind
(Yes, there is a difference from the other photo-the thread behind my left forefinger is underneath the thread coming from the needle in my right hand)
 
Second loop on needle-thread is underneath
 
You will end up with two stitches that should look like this:


You just continue to make the stitches until you have a piece the length you want or need to do something else, like add a picot!

To add picots, pull the first loop of a stitch up, but stop, leaving a space (depending on size of picot). Make the second loop of the stitch and pull both up to the previous stitches. Picot formed.
 
Forming a picot
 
To form a circle, using the thumb and fore finger of the left hand and holding the needle with the right hand, slide the stitches to the eye-end of the needle and off onto the thread.
                                                      Pull until end loop is about 2 inches long. 
                              Take needle through this loop and continue to pull to close ring.
                                                Continue pulling until loop is closed.
                                                                        Closed loop
Thread from the ball is on the left handside

To continue tatting, hold the ring and needle in your right hand with your thumb and forefinger, making sure that that the thread from the ball is to the left (this insures the ring will remain with the right side facing). Pick up the thread from the ball and wrap clockwise around your left thumb and begin making stitches as before, being sure to pull the first loop up as close to the end of the ring in your right hand as possible.

 
You can add tatted chain between your rings or make a line of rings until you have the length you require. The length of tatting can then be hand stitched to an item. Or you can tatt the trim directly onto an edge (as in SAGANews Volume 36 Issue 3). That edge can be a sleeve, hem, blanket or hankie.
There are many books and items on the Internet about needle tatting. Supplies are available from various sources and tatting thread is readily available as is perle cotton. So I hope you will give it try as there are many uses for even the most simple of pieces, as can be seen on the Wee Care™ in SAGANews Volume 36 Issue 3.


Monday, August 10, 2015

SAGANews Volume 36 Issue 3

The next issue of SAGANews (Volume 36 Issue 3) is in the mail and should be arriving in your mail box very soon!


This issue is dedicated to Wee Care with some new patterns and designs from our talented members.

If you want to preview this issue, it will be posted on the on the SAGA website (www.smocking.org) in the Members Only section soon. You can also go back through the archives and look at previous issues of the magazine. They are all available as PDFs.

SAGANews is published four times a year. The articles and projects featured are all original and submitted by SAGA members. Do you have something you would like to share? Please email saganews@smocking.org with a brief outline of the article/project and include photos if appropriate. Maybe there is something you would like to see featured in the magazine? Email me and let me know.

Wednesday, August 5, 2015

Scissor Storage

I have this vintage rack (originally designed to display teaspoons) in my sewing room and I use it to store the little embroidery scissors (I seem to have acquired) when they are not in use.


I also display a few of my hankies. It makes for an interesting piece of wall art.

My larger scissors and other handy tools are held by a magnetic knife rack which is fixed to the wall within reach of my sewing machine.


My snips and 4 inch trimming scissors are next the the sewing machine.


Where are your sewing scissors and how do you store them for easy use?

Saturday, August 1, 2015

Funny where you see smocking...

I was recently visiting the Williamsburg area of Brooklyn, New York when I came across this piece of artwork on a street corner. A baby Lady Liberty and she is wearing a smocked dress-what else?


Then on the side of a building was this advert for the New York Yankees, but it too had a sewing connection.

 
And in a boutique shop window were a top and skirt with fabric that  looked as if it was faggoted together. Cute idea I thought.


 So, you never know what you might find on any street corner, building wall or shop window!

Oh! And this was the view from the water front.
On the left, the Brooklyn Bridge leading towards the One World Trade Centre building on the right.

The Empire State Building on the left. The Chrysler Building in the middle and the new 'match stick' building on the right with the UN in front of it.